 Perfect Logitech Squeezebox Touch Replacement")
The Logitech Squeezebox Touch was a life-changing device. I vividly recall seeing it on the cover of Stereophile, reading the review, and then purchasing one the same day for $300. That is still the best $300 I have ever spent on a piece of audio equipment. The Touch not only put my entire library of FLAC and MP3 files at my fingertips, but also let me stream Pandora, Tidal, and countless other services, and it provided SPDIF and optical outputs so that I could use it with my favorite DAC. The Touch did not have the most user friendly or intuitive music-server software, but once you had it up and running, it was easy to use, stable, and highly reliable. I would often go months without rebooting it, even with everyday use.
Like others, my Touch finally died last year. Replacing it does not make sense given the price that used units are commanding and the fact that they are all likely to break down in the next few years. I will never understand why Logitech discontinued this amazing product, although I’ve heard that the user-support costs were astronomical, which does not surprise me given the set-up issues.
So what to replace it with? Sonos is a popular option, but there are a few downsides. First and foremost is cost. Sonos is not cheap, particularly if you want to have multiple zones, although the quality is superb in my experience. The Sonos Port (formerly the Connect) is a great device, but it retails for $449! That is $150 more than the Touch sold for and the Port doesn’t include a touchscreen!
Second, my kids love the touchscreen! They are too young for phones, so the touchscreen is the primary way in which they access music. It gives them the freedom to explore different artists and albums and play music whenever they feel like it. They have no idea, of course, how lucky they are to have so many choices at their fingertips, whereas I still remember agonizing over which CDs to buy with my very limited funds. (Yet I somehow found the money for Vanilla Ice in grammar school.)
After researching several Sonos alternatives, I settled on building a Raspberry Pi-based replacement for my Touch. This is so incredibly cheap and easy, and the end result so wonderful, that I cannot recommend it strongly enough.
The sum total of the parts list is:
- A Raspberry Pi (I used Model 3 B+, but there is now a Model 4 available) with power cord;
- A 4gb micro SD card to flash the software to;
- The Official Raspberry Pi Touchscreen; and
- A case – I recommend this model from Amazon (I added an L shaped micro USB adapter to better hide the cord)
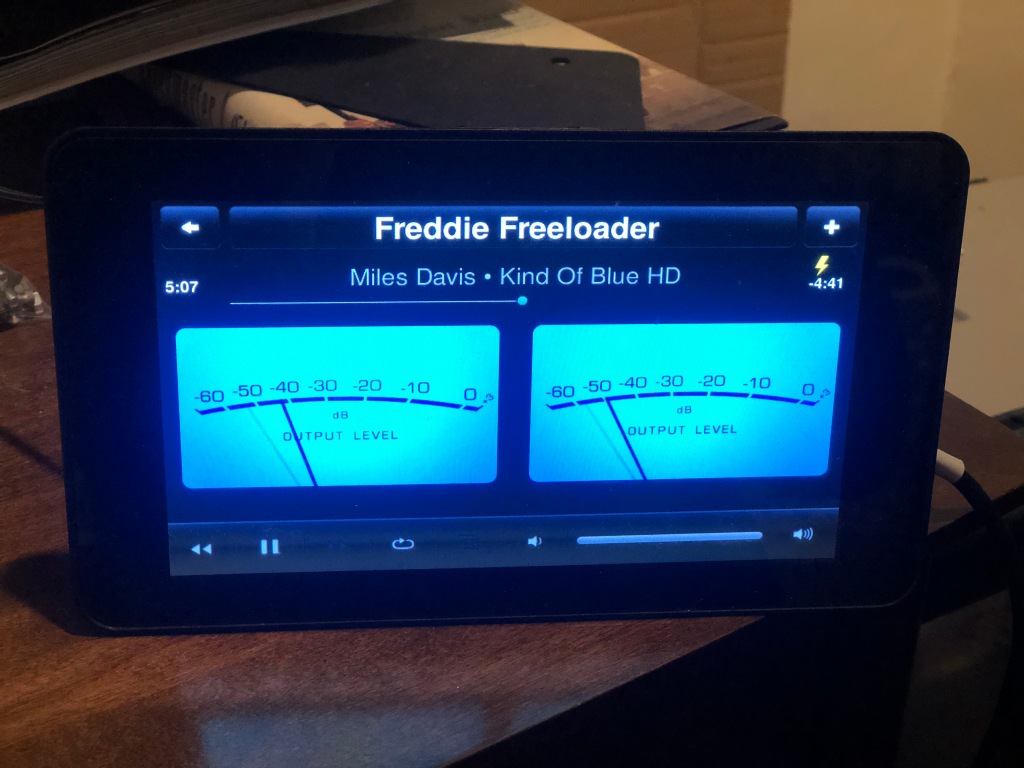
The first step is to download the software. I use the Pi Core Player software from picoreplayer.org. It is incredibly stable and has a fairly good web interface. I also love that it offers the blue McIntosh-esque meters! I have also used Max2Play, which worked well, although I found it to be slightly less stable and the graphical interface less attractive.
Before setting it all up, there are a few things to know. First, LMS stands for Logitech Media Server and is the main software that streams music from your network drive or online services such as Tidal or Spotify. Second, Squeezelite is the software that allows the Raspberry Pi to function like a Squeezebox, which you can control from the touchscreen or from your phone (for which the iPeng app is a MUST download). Third, Jivelite is the graphical user interface for Squeezelite that allows you to use the touchscreen.
Here are the basic steps for setup:
- Download the Pi Core Player software image file for the Raspberry Pi model that you bought.
- Burn the image to the mini SD card. I used the free software Win32DiskImager to do this. If you need to format the SD card, I used SD Card Formatter, which is also free.
- Install the SD card into the SD card slot in the Raspberry Pi.
- Install the Raspberry Pi touchscreen per the instructions that come with it.
- Place the Raspberry Pi and touchscreen into the case.
- Run an ethernet cable from your router to the Raspberry Pi (this is only for the initial setup, don’t worry)
- Power up the Raspberry Pi by plugging in the power cable. Wait 2 minutes or so.
- Access the web interface for Pi Core Player based on the IP address for the ethernet port you used. This is usually 192.168.1.1 or .101 or .102 or .103 or .104. You type that address into a web browser on any computer on your network. If you have problems finding it, you may need to read the documentation for your specific router.
- After you can access the Pi Core Player web interface, the first step is to activate the Wifi on the Wifi Settings tab. This is pretty self explanatory. You’ll need to know your network name and password.
- You only need to run LMS on one computer. Assuming this Pi is the one you want to run it on, go to the LMS tab and install it. You can manage all the settings by clicking the LMS Web Page link. You will need to create an account on MySqueezebox.com to access certain apps. This will all take some trial and error, but none of it is terribly hard.
- Assuming you are using a USB DAC (which I highly recommend), choose “USB Audio” on the Squeezelite settings tab. For the output setting, I use “hw:CARD=B10,DEV=0”. But there is a website that tells you the setting for many dacs: https://sites.google.com/site/picoreplayer/home/List-of-USB-DACs
- You then need to go to the Tweaks tab and install Jivelite. When that is complete, you should restart the player (if you haven’t already) and try to boot it up without the ethernet cable.
- Your router will assign the Raspberry Pi a new IP address, and you will need to watch the boot-up screen on the Raspberry Pi to see that address. It will say some thing like “To setup Picoreplayer, use the web interface via a web browser: http://192.168.1.109”. You will use that address going forward to access the web interface.
- If you want to add a network hard drive, go the web interface page and then go to the LMS tab. This is actually where I had the most trouble. You need the IP address for your hard drive and the folder with your music. Enter the folder name under “Mnt Point”. Enter the IP address under IP Address. Assign a Share Name, which can be anything. CIFS worked for me under Share Type. User name is the user name for your router (often “Admin”). Password is the password for your router. And for options, I use “uid=1001,gid=50,vers=1.0” Some people might not need the vers=1.0, but I couldn’t get it to work without that.
Once you have it up and running, I recommend changing the screen saver settings by going to “Settings” and then “Screen” on the touchscreen menu and turning “display off” when music is stopped or the unit is powered down.
That’s it. It might take some work to get it up and running, but once you do, you won’t be disappointed. Again, download iPeng so that you can also control it using your phone. If you have problems, feel free to contact me via this site and I will do everything I can to help.
I hope you enjoy it as much as a I do. And I guarantee you will want to add more zones!

I have an almost brand new touch, still has the protective plastic on it. I used it once or twice for testing programs I as writing to control LMS but then got vortexboxes instead. I jave no recall what it cost brand new but if you make an honest offer near original cost I’d take it.
LikeLike
Sorry, not interested right now, but appreciate the offer!
LikeLike
Hi Dan, just ran accross your offer, do you still have the Touch and are you still willing to sell.
LikeLike
Excellent article. Unfortunately I just don’t have the confidence to attempt this; there are just so many opportunities for something to go wrong, and I’m an absolute technophobe. Such a shame that there is no pre-built SB Touch alternative on the market; I simply want something that will stream my hi-res FLACs and DSF files from my computer and connect to my external DAC via USB. And be controlled by remote control or app. That’s it! But look what’s out there now: I don’t need a built-in amp nor a built-in DAC (let’s be honest: the built-in SB Touch DAC is awful, too). I don’t need Bluetooth. I just need a simple little streamer to stream my own library of 24/96, 24/192 and DSD files like my SB Touch does. I know my Touch won’t last forever, and when it dies I’ll be screwed!
LikeLike
Does the Raspberry Pi stream DSD/DoP + 24/192 PCM like the SB Touch (with relevant plug-in installed) does?
LikeLike
Yes. I have streamed DSD with the Pi in the same way that I could with the SB Touch.
LikeLike
Well, I have come up with several solutions.
LikeLike
Great post!
The PiCore player provides a functional replacement for the Touch – and also, once set up, can be viewed as an appliance – needs little technical knowledge to keep it evergreen.
Very small update: Logitech have now fully detached from the LMS ecosystem, so it has a new name – LMS now stands for Lyrion Music Server – tho much else is already the same.
Some users relied upon a service at mysqueezebox.com – that is now discontiued and all users of LMS players etc must have a home server of some type. These are very easy to set up – the PiCore player described above can include hosting LMS. Note however that all services which previously went via mysqueezebox.com all still function via the latest LMS (v8.5.2 in early Sept 2024) – so no loss of functionality.
Latest links:
* Lyrion documentation:
* Forums for all things LMS, including PiCore player (aka pCP):
LikeLike
This looks nice, and I shall give it a go.
If the LMS is on a different server, as mine is, is step 10 redundant and you just select the Pi from the web dropdown?
LikeLike
Sounds great, thanks for the recommendation as I’m also sitting in front of a dead Squeezebox Touch. Do you see a possibility to use my existing remote controls further (Logitech Controller, Squeezer App etc.) also with a PI-based replacement solution?
LikeLike